DIY solar panel ground mount: a hinged A-frame you can build in three hours
A panel leaning on a wall dies in the first windstorm. A simple A-frame holds it at the right angle, survives the weather and lets you follow the seasons.
In this article
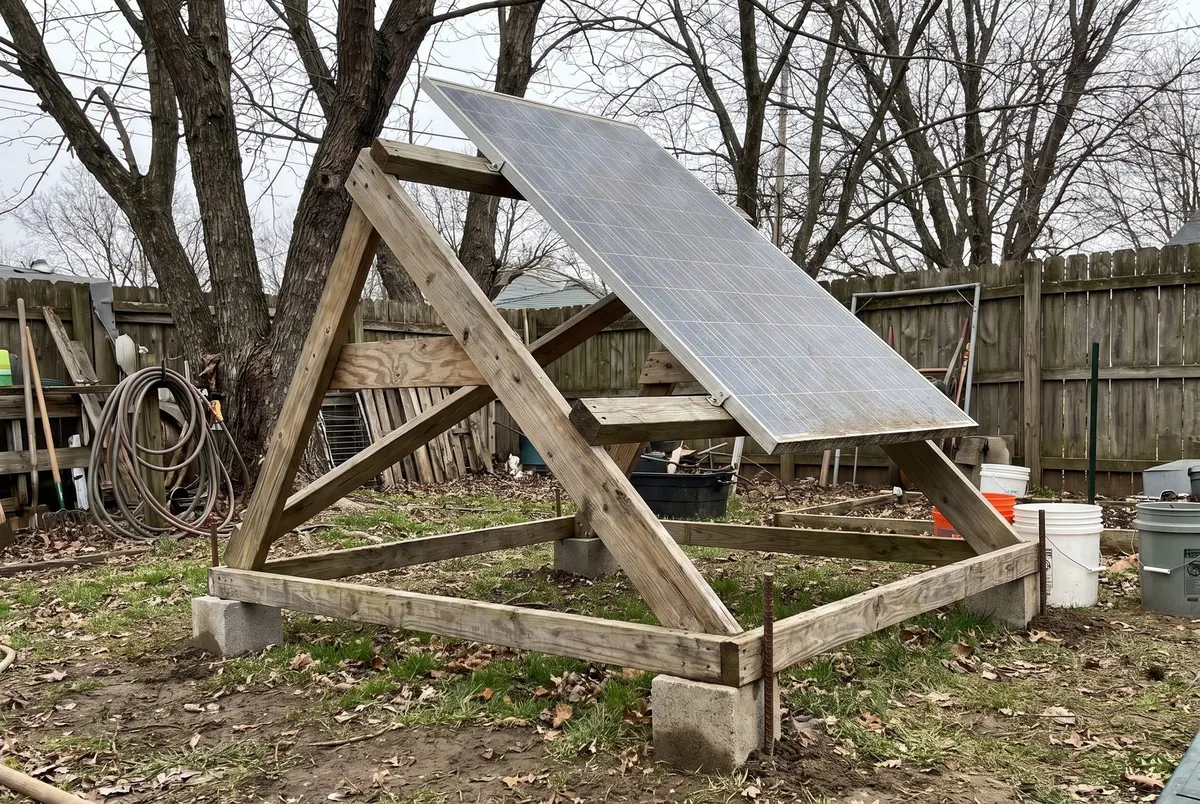
A DIY solar panel ground mount is a simple A-frame of pressure-treated 2x4s with a hinged back leg, so you can set the panel's tilt and change it with the seasons. Bolt the panel through its factory mounting holes, anchor all four corners, face it true south and tilt it to your latitude. Per The Off-Grid Handbook, the build takes about three hours and about $60 in materials.
It is Project 19 in the book, and it exists for one reason. A panel propped against a wall or a fence loses its angle, catches the wind, and usually fails in the first storm, along with the output you were counting on.
Why a ground mount instead of the roof?
For a small backup system, the ground is the easy place to put a panel. You can reach it, you can adjust it, and you can move it if a tree starts shading it.
- No roof penetrations and no ladder work.
- Tilt changes take a minute, so you can chase the winter sun.
- You can pick the spot with the best sun on the property, not the roof you happen to have.
- A short wire run to a station in the garage or shed, like the DIY solar charging station this mount was designed to feed.
What is the best solar panel tilt angle?
The baseline is your latitude. The federal Energy Information Administration explains that tilting a panel toward the south at an angle equal to its latitude maximizes its yearly exposure to direct sunlight, and a federal solar planning guide from the National Renewable Energy Laboratory gives the same rule for maximum annual collection.
Tilt is measured from flat ground: zero degrees is a panel lying flat, 90 degrees is a panel standing straight up. The book adds a seasonal adjustment for anyone who wants more yield: steepen about 15 degrees for winter and flatten about 15 degrees for summer.
| Your latitude | Winter tilt | Year-round tilt | Summer tilt |
|---|---|---|---|
| 30° | 45° | 30° | 15° |
| 35° | 50° | 35° | 20° |
| 40° | 55° | 40° | 25° |
| 45° | 60° | 45° | 30° |
If you only adjust once a year, adjust for winter. The book's field note puts it plainly: summer forgives, December does not. Short days and a low sun are exactly when an outage-ready system has the least to spare.
How to build an A-frame solar mount
The materials are pressure-treated 2x4s, exterior hinges and hardware, ground anchors or screw-in stakes, and bolts for the panel. The tools are a saw, a drill or driver, and an angle finder, which can be a phone app.
- Build the A-frame with a hinged back leg, so the tilt is adjustable instead of fixed.
- Set the tilt to your latitude as the year-round baseline. Steepen about 15 degrees for winter, flatten about 15 degrees for summer if you want more yield.
- Through-bolt the panel to the frame at the manufacturer's mounting points. Never drive self-tapping screws into the panel frame.
- Anchor the frame to the ground on all four corners. A panel is a sail, and an unanchored frame will move in a gust.
- Do a site check across a full day and clear or relocate anything that throws shade on the panel.
Setting the angle on an adjustable solar panel stand
Lay the angle finder flat on the face of the panel, not on the wooden legs, and move the back leg until the reading matches your target. Mark the leg position for each season on the frame with a pencil or a screw, so the next change takes seconds.
Where to put the mount: direction and shade
In the Northern Hemisphere, face the panel true south. A phone compass set to true north handles the difference from magnetic north for you.
Shade is the bigger risk. The book warns that one sliver of shade across a panel can cut output by half or more, and federal planning guidance makes the same point: even a narrow strip of shading can limit the current of the entire array. Check the spot in the morning, at midday and in the late afternoon before you set the anchors.
Think about winter shade as well. A spot that is clear in June can sit in the shadow of a bare tree trunk or the house when the sun is low in December, so watch it again after the leaves fall.
Common ground mount mistakes
Most failures of a simple mount come from a handful of shortcuts. Check your build against this list before the first storm.
- Measuring the angle on the legs instead of the panel. The panel face is what has to sit at your latitude.
- Aiming by a compass set to magnetic north without allowing for the difference from true north.
- Checking for shade at noon only, or only in summer.
- Driving self-tapping screws into the panel frame instead of through-bolting at the factory holes.
- Leaving the frame unanchored because it feels heavy enough.
- Forgetting the winter adjustment, when the sun is lowest and the system needs it most.
After a windstorm, walk out and look. Check that the anchors are still tight in the ground, the hinge hardware has not loosened, and the tilt has not slipped from its mark.
Wiring the ground mount to your system
Keep the mount reasonably close to the battery and controller. Every foot of wire between panel and controller costs a little voltage, and long runs call for heavier wire; the book's charging station uses 10 AWG leads with MC4 connectors.
If you plan to add panels later, the controller decision changes with size. Our guide to MPPT and PWM charge controllers covers when the more expensive type pays for itself, and the guide on sizing a solar generator shows how to work out how much panel you need in the first place.
The same south-facing logic applies to the book's heat projects. If you are also building a DIY solar air heater, the site check you just did tells you where it should go.
Frequently asked questions
What angle should my solar panels be at?
Start with your latitude. Tilting a panel toward the south at an angle equal to your latitude maximizes its yearly exposure to direct sun, according to the U.S. Energy Information Administration. For more output, The Off-Grid Handbook suggests steepening about 15 degrees in winter and flattening about 15 degrees in summer. Measure the angle on the panel's face, from horizontal.
Is it better to put solar panels on the ground or the roof?
For a small backup system, a ground mount is usually simpler. There are no roof penetrations or ladder work, the tilt is easy to change with the seasons, and you can choose the sunniest, least shaded spot on the property. The trade-off is space in the yard and the need to anchor the frame against wind.
How do you anchor a ground mount solar panel?
Anchor all four corners of the frame with ground anchors or screw-in stakes, as The Off-Grid Handbook specifies. A tilted panel catches wind like a sail, so a frame resting on the ground without anchors can shift or tip in a gust. Through-bolt the panel to the frame at the manufacturer's mounting points.
How much does shade affect a solar panel?
A lot. The Off-Grid Handbook warns that one sliver of shade across a panel can cut output by half or more, and federal solar planning guidance notes that even a narrow strip of shading can limit the current of the whole array. Check your site at morning, midday and late afternoon before anchoring the mount.
Sources
- The Off-Grid Handbook, Garrett Dalton, Project 19
- U.S. Energy Information Administration: Solar panel tilt and latitude
- NREL / U.S. Department of Energy: Solar Ready Buildings Planning Guide
- U.S. Department of Energy: Homeowner's Guide to Going Solar
Safety guidance changes. Check the agency pages above for the current version, and follow your local code and manufacturer instructions.