DIY rocket stove: how to build one from bricks in an afternoon
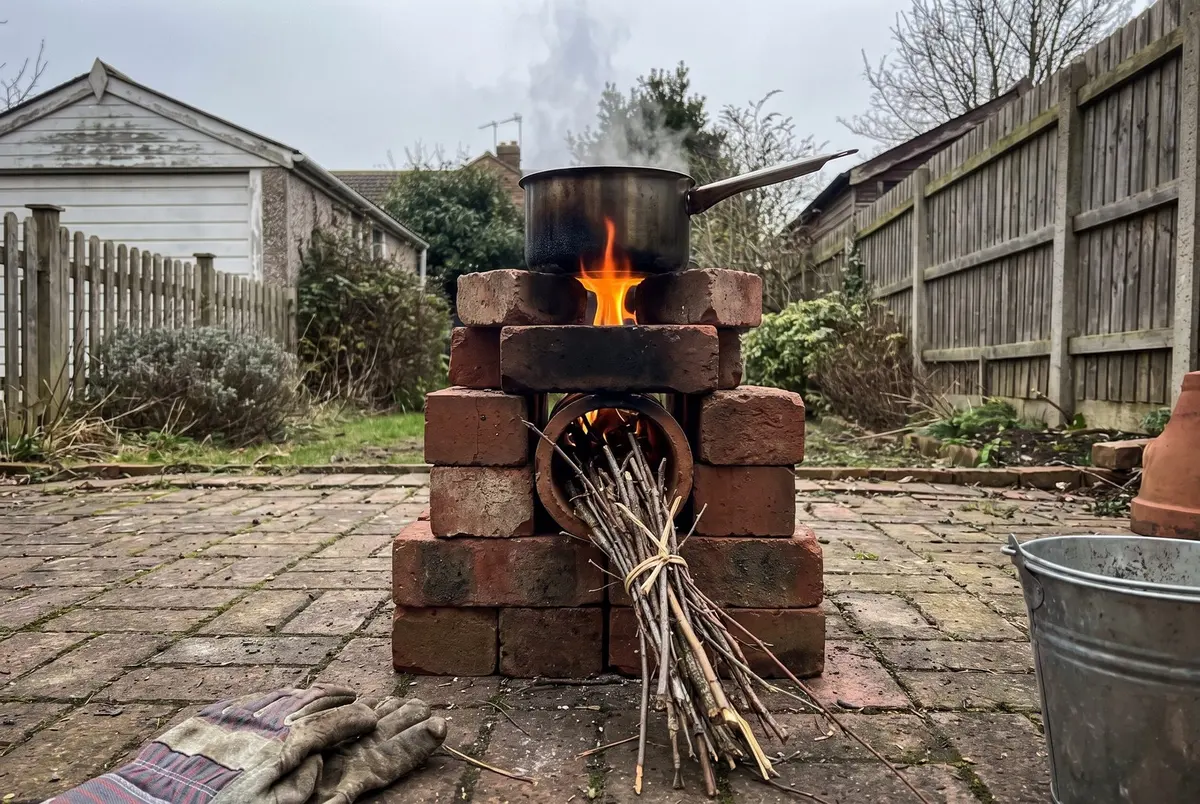
A pot of water boiling on a double handful of sticks, from a stove you can stack in an afternoon. It is an outdoor appliance, every time.
In this article
A DIY rocket stove is an L-shaped brick stove: a horizontal feed tunnel where you push in thin sticks, meeting a short vertical chimney that pulls air through the fire and sends the flame straight up into the pot. You can dry-stack one from 24 to 30 solid bricks in about two hours, with no mortar.
Per The Off-Grid Handbook, it brings a liter of water to a full boil in about 6 to 8 minutes on a handful of twigs. It is used outdoors only, on a level pad, at least 10 feet from any structure.
The design is Project 50 of the book, which calls it the outdoor cooking engine of the fuel-scarce scenario. Here is how it works, how to build it and where it belongs.
How a rocket stove works
The chimney's draw is the engine. Hot gas rises in the vertical column, which pulls fresh air in through the feed tunnel and under the burning wood. The fire burns hot and fast, so more of the wood turns into heat at the pot.
That efficiency is the point. The book's fuel math: a woodpile that would feed a fireplace for a week feeds a rocket stove's cooking needs for a season. In a long outage, it lets you cook on yard scraps and save the stored propane.
What you need for a rocket stove with bricks
- 24 to 30 solid clay bricks. Firebrick is ideal for the core, where the heat is highest.
- A grate or a few steel bars to hold the pot.
- A level pad of bare ground, sand or pavers.
- A trowel and mortar, only if you want the stove to be permanent.
- Small, dry wood about as thick as a pencil, plus a bucket of water or a fire extinguisher.
Per the book, the materials run about $30 if you buy the bricks. The design calls for solid clay bricks, so skip hollow blocks and anything painted or treated.
Rocket stove design, step by step
- Pick the site. Outdoors, on a level pad, at least 10 feet from the house, sheds, fences and anything else that burns, with nothing overhead. Check for local burn bans first.
- Stack the L. Dry-stack a horizontal feed tunnel that meets a vertical chimney 3 to 4 brick courses tall.
- Split the feed opening. Set a shelf across the feed tunnel so the wood rests on the upper half and air is drawn in underneath it.
- Set the pot support. Lay the grate or steel bars on top so the flame gap under the pot is 1 to 2 inches. Too tight chokes the fire, and too loose wastes the heat.
- Fire it. Light a little dry kindling at the back of the tunnel, then feed pencil-thin dry sticks tips-first, pushing them in as they burn.
Expect a boil on a liter of water in about 6 to 8 minutes, per the book. If the stove smokes heavily, the wood is usually too wet or too thick; the EPA notes that dry, well-seasoned wood burns hotter and cleaner.
Dry-stacked or mortared?
The book gives you both options. A dry-stacked stove needs no tools, goes up in an afternoon and can be taken apart and moved, which suits renters and anyone testing the design first. A trowel and mortar make it permanent, so it stays square after a season of use.
Either way, build it where it will live, on its pad, so you never move a hot stove. Practice once before you need it, on a calm, dry day: the learning curve on feeding and flame gap is short, but it is easier in good weather than during a storm cleanup.
Cooking on a rocket stove
- Use heavy cookware. The handbook's outdoor kit is a cast iron skillet and a Dutch oven.
- Feed steadily in small amounts. Thin sticks keep the flame high and clean, while a big log smothers it.
- Boil and fry on the rocket stove, and save slow simmering for a stove with an adjustable flame.
Rocket stove vs. camp stove for outdoor emergency cooking
| Brick rocket stove | Propane camp stove | |
|---|---|---|
| Fuel | Twigs, yard scraps, scrap lumber that isn't painted or treated | Propane tanks or canisters |
| Fuel supply | Renewable from the yard | Limited to what you stored |
| Setup | Built once, stays outside | A few minutes, portable |
| Heat control | Hot and fast, little simmer control | Adjustable flame |
| Where to use it | Outdoors only | Outdoors only |
The two work best together. The handbook's outdoor cooking station uses a two-burner propane stove and cast iron for everyday meals, and the rocket stove stretches the fuel when an outage drags on. For menus and planning, see how to cook without electricity and the 30-day food supply list.
Can you use a rocket stove indoors?
No. A rocket stove is an outdoor appliance, permanently and without exception. A clean, efficient burn still produces carbon monoxide, which is colorless and odorless.
The book is explicit that burning one inside a garage, porch or house is a lethal CO event. The CDC applies the same rule to every portable cooker: never use a portable camp stove indoors and never burn charcoal indoors. An open garage door or a screened porch does not make a space outdoors.
Keep a working carbon monoxide alarm inside the house anyway, because smoke and exhaust drift through open windows and doors. Our guide to CO detector placement covers where it goes.
Rocket stove safety outdoors
- At least 10 feet from structures, with clear sky overhead, per the book.
- Water or a fire extinguisher within reach the whole time.
- Never leave it lit and unattended.
- Follow local burn bans and fire restrictions.
- Let it cool completely before you touch or move the bricks, which hold heat long after the flame is out.
A rocket stove is good for boiling water as well as cooking. If you're boiling or treating water to make it safe to drink, follow the method in our guide to purifying water with bleach, which also covers when boiling is the better choice.
Frequently asked questions
How many bricks do you need for a rocket stove?
The Off-Grid Handbook's brick rocket stove uses 24 to 30 solid clay bricks, with firebrick ideal for the core where the heat is highest. You also need a grate or a few steel bars to hold the pot and a level pad of ground, sand or pavers. Dry-stacked with no mortar, it takes about two hours to build.
Can you use a rocket stove indoors?
No. A rocket stove produces carbon monoxide like any fire, and burning one in a house, garage or porch can kill. The CDC says never to use portable camp stoves or burn charcoal indoors, and the same rule applies here. Use it outdoors only, at least 10 feet from structures, with nothing overhead and water or an extinguisher nearby.
What wood is best for a rocket stove?
Small, dry sticks about as thick as a pencil, fed tips-first into the tunnel as they burn. Dry wood burns hotter and makes far less smoke than green or wet wood. Twigs, branches and scrap lumber that isn't painted or pressure-treated all work, which is why a rocket stove can cook for a season on a modest woodpile.
How long does it take a rocket stove to boil water?
Per The Off-Grid Handbook, a well-built brick rocket stove typically brings a liter of water to a full boil in about 6 to 8 minutes. The keys are a 1 to 2 inch flame gap under the pot, a split feed opening that lets air in under the wood, and pencil-thin dry sticks fed steadily.
Sources
- The Off-Grid Handbook, Garrett Dalton, Project 50
- CDC: Carbon Monoxide Poisoning Basics
- EPA Burn Wise: Best Wood-Burning Practices
- Ready.gov: Power Outages
Safety guidance changes. Check the agency pages above for the current version, and follow your local code and manufacturer instructions.